Before delving into the intricacies of group policies and connecting users to network resources, we must ensure that our users have a connection to the network. This guide explains how to create a Windows 11 Pro desktop environment customized for a user and integrate it with our domain. Let's begin this foundational journey to establish a strong base for advanced network operations.
Table of Contents
Terminology
Windows Active Directory (AD): A directory service developed by Microsoft for Windows domain networks. It manages all users and computers in a Windows domain-type network.
VirtualBox: An open-source virtualization software that allows you to run multiple operating systems on a single physical machine.
ISO Image: An archive file (also known as a disc image) that contains everything that would be written to an optical disc, like a CD, DVD, or Blu-ray Disc.
Windows 11 Desktop ISO: A disk image of the Windows 11 operating system used to install the system on virtual or physical machines.
Virtual Machine (VM): Software-based emulation of a computer system, running in an isolated environment on a physical host machine.
Network Address Translation (NAT): A method of mapping one IP address space into another, allowing multiple devices in a local network to use one IP address for access to external networks, such as the internet.
Domain Controller: A server that responds to authentication requests within a Windows Server domain.
DHCP (Dynamic Host Configuration Protocol): A network protocol used in IP networks where a DHCP server automatically assigns an IP address to a device's network interface.
Active Directory Computer Account: An object in AD that represents a computer and allows it to join a domain.
Pre-requisites: What You Need to Start
This guide assumes that you are using Windows Server 2019 and have Windows Active Directory installed. Additionally, ensure that you have set up DHCP on your Domain Controller and created a standard user account to be able to log into the desktop after setup. Links for these guides are provided below for easy access.
Choosing Your Tools and Preparing for Setup
I have chosen VirtualBox as the virtualization platform for our Active Directory Lab. We will also utilize the Windows 11 Desktop ISO to emulate an employee desktop.
Essential Downloads for Setup
To follow along with this tutorial, please ensure you have downloaded and installed the following software:
VirtualBox - The chosen platform for virtualization within this guide.
Windows 11 Desktop ISO - The operating system that will be used as our employee's desktop.
Setting Up The Virtual Machine Hardware
In this section, we will walk through the process of configuring your new virtual machine's hardware settings in VirtualBox.
Step 1: Launch VirtualBox and Create a New Virtual Machine
Open the VirtualBox application on your computer and click on the New button. This will open the Create Virtual Machine window.

Step 2: Configure Virtual Machine Name and Operating system
Once the Create Virtual Machine window opens, input the following details:
Name: Enter a name for your virtual machine. This helps to easily identify it later.
Folder: Specify the file location where the new virtual machine will be stored on your computer.
ISO Image: From the dropdown menu, select the Windows 11 Desktop ISO image you've previously installed on your computer. If it's not immediately visible in the list of options, choose Other and browse to the appropriate folder to find its location on your system.
Skip Unattended Installation: Ensure this option is checked, as we will want to perform a manual installation to ensure our VM is set up correctly to connect to our corporate domain.

Step 3: Allocate Memory and Processors
Next, move on to the hardware settings, where you will set the amount of RAM and CPU cores to allocate to your virtual machine.
Base Memory: This refers to the amount of RAM allocated to your virtual machine. For this lab setup, allocate at least 4 GB (4000 MB). You can adjust these allocations later if needed.
Processors: Determine the number of CPU cores allocated to your virtual machine. I assigned four cores for faster performance; however, one core will work as well.

Step 4: Allocate Virtual Hard Disk Space
Lastly, designate the amount of hard drive space to assign from your computer to the virtual machine.
Disk Size: This is the amount of hard drive space allocated to your virtual machine. For this lab setup, I assigned 20 GB. Remember, you can always adjust these allocations later if necessary.

Step 5: Review VM Hardware
Review your hardware allocations for your VM and select Finish.

Now that we have successfully set up the basic hardware for our virtual machine, there is one more network setting to adjust next.
Configuring VM Network Settings
In the upcoming section, we'll fine-tune the network configurations for our virtual machine. Our objective is to transition from the default network adapter to an internal network setup. This adjustment will empower our desktop to retrieve an IP address from the DHCP server on our Domain Controller, ensuring seamless internal communication within our corporate infrastructure.
Step 1: Access Network Settings
To start, right-click on your newly created virtual machine and select Settings.

Step 2: Configure Adapter 1 for the Internal Network
Once opened, navigate to the Network tab. Initially, Adapter 1 is set to Network Address Translation (NAT) by default. In this configuration, the Windows Desktop would be allocated an IP address from our home network. To ensure our Domain Controller's DHCP server assigns the IP address instead, navigate to the NAT dropdown and switch it to the internal network option. The Name should be set to internal as well.
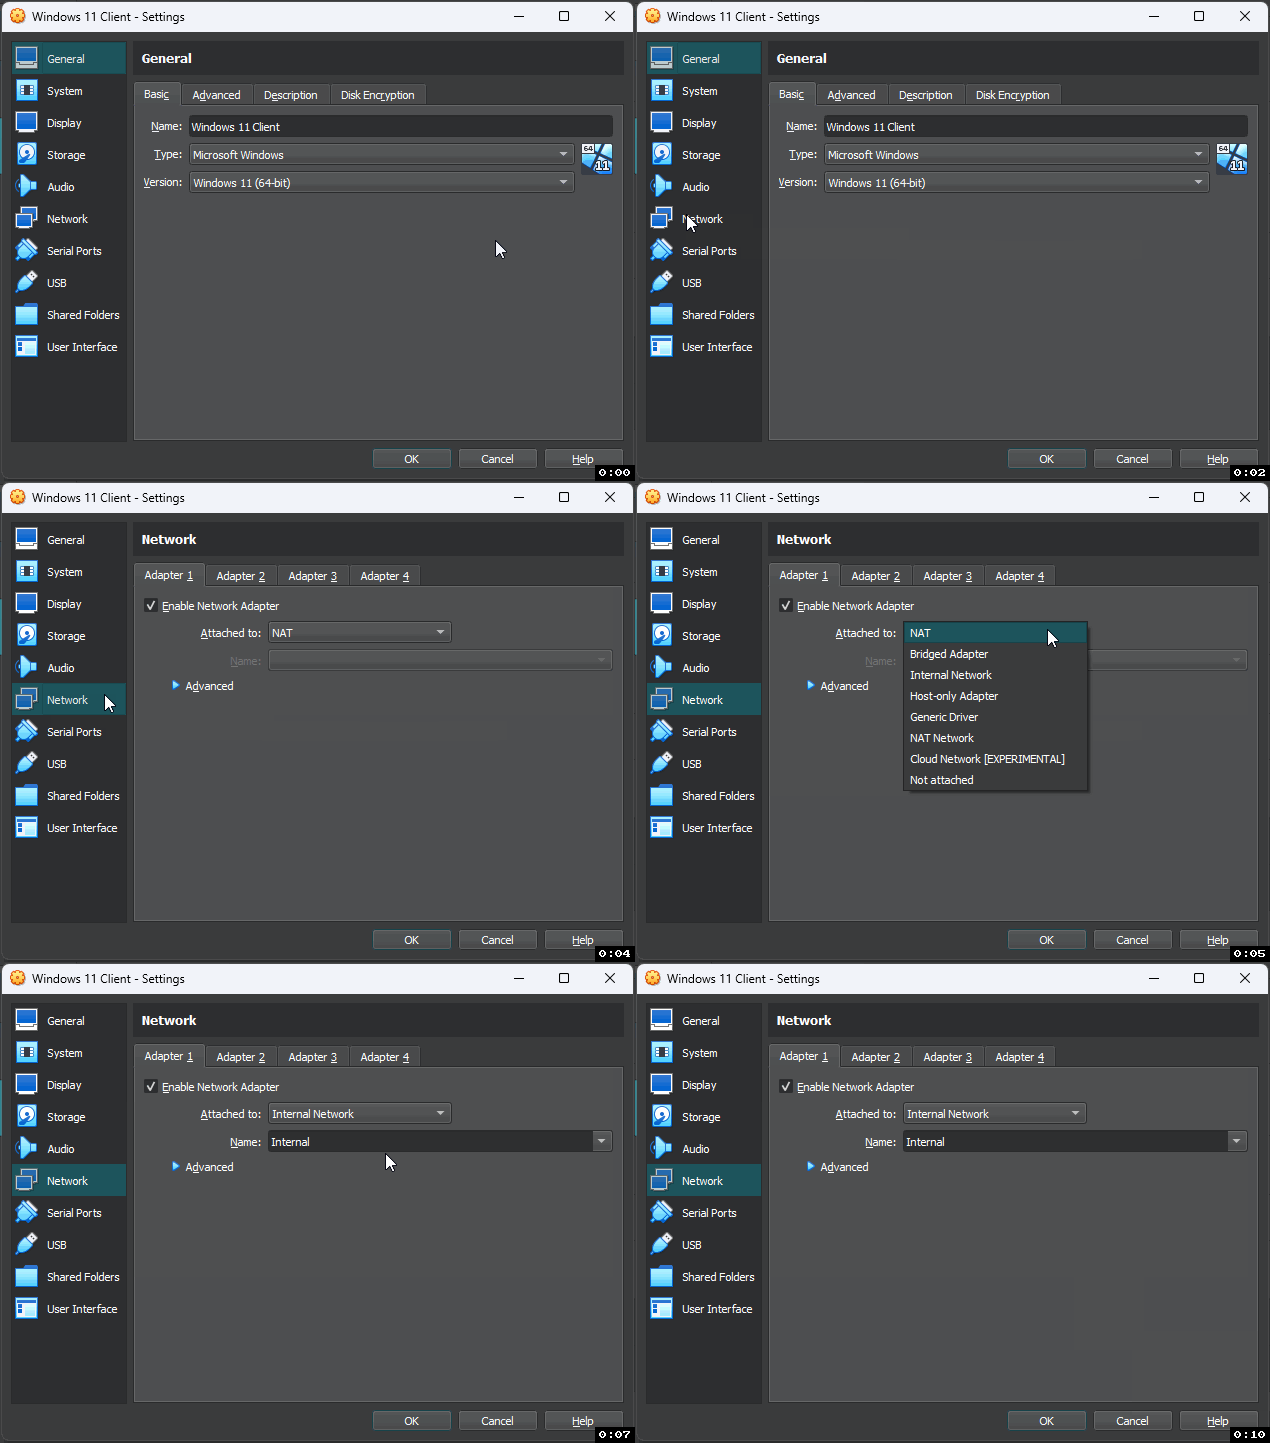
By transitioning from the default NAT setting to an internal network, we've optimized our desktop's connectivity to ensure it seamlessly integrates with our corporate infrastructure, sourcing its IP address directly from our Domain Controller's DHCP server. With these configurations in place, we're primed for smooth and efficient internal communications.
Installing Windows 11 Desktop ISO
In this section, we will install the Windows 11 Desktop ISO onto our newly created virtual machine.
Step 1: Boot the Virtual Machine from ISO
Upon launching your virtual machine, you'll briefly see a message that prompts, "Press any key to boot from CD or DVD..." When you encounter this, promptly press any key on your keyboard. This ensures that the VM initiates its boot sequence from the Windows ISO.

Step 2: Follow the Installation Prompts
During the initial startup, you'll encounter several prompts:
Prompt 1: Select Next
Prompt 2: Select Install now
Prompt 3: Select I don't have a product key
Prompt 4: Choose the Windows 11 Pro option. This option allows us to connect our computer to our internal domain.
Prompt 5: Check the box to agree to terms, then select Next
Prompt 6: Select Custom: Install Windows Only (Advanced)
Prompt 7: Choose the hard drive disk space that was previously allocated to our virtual machine, then select Next
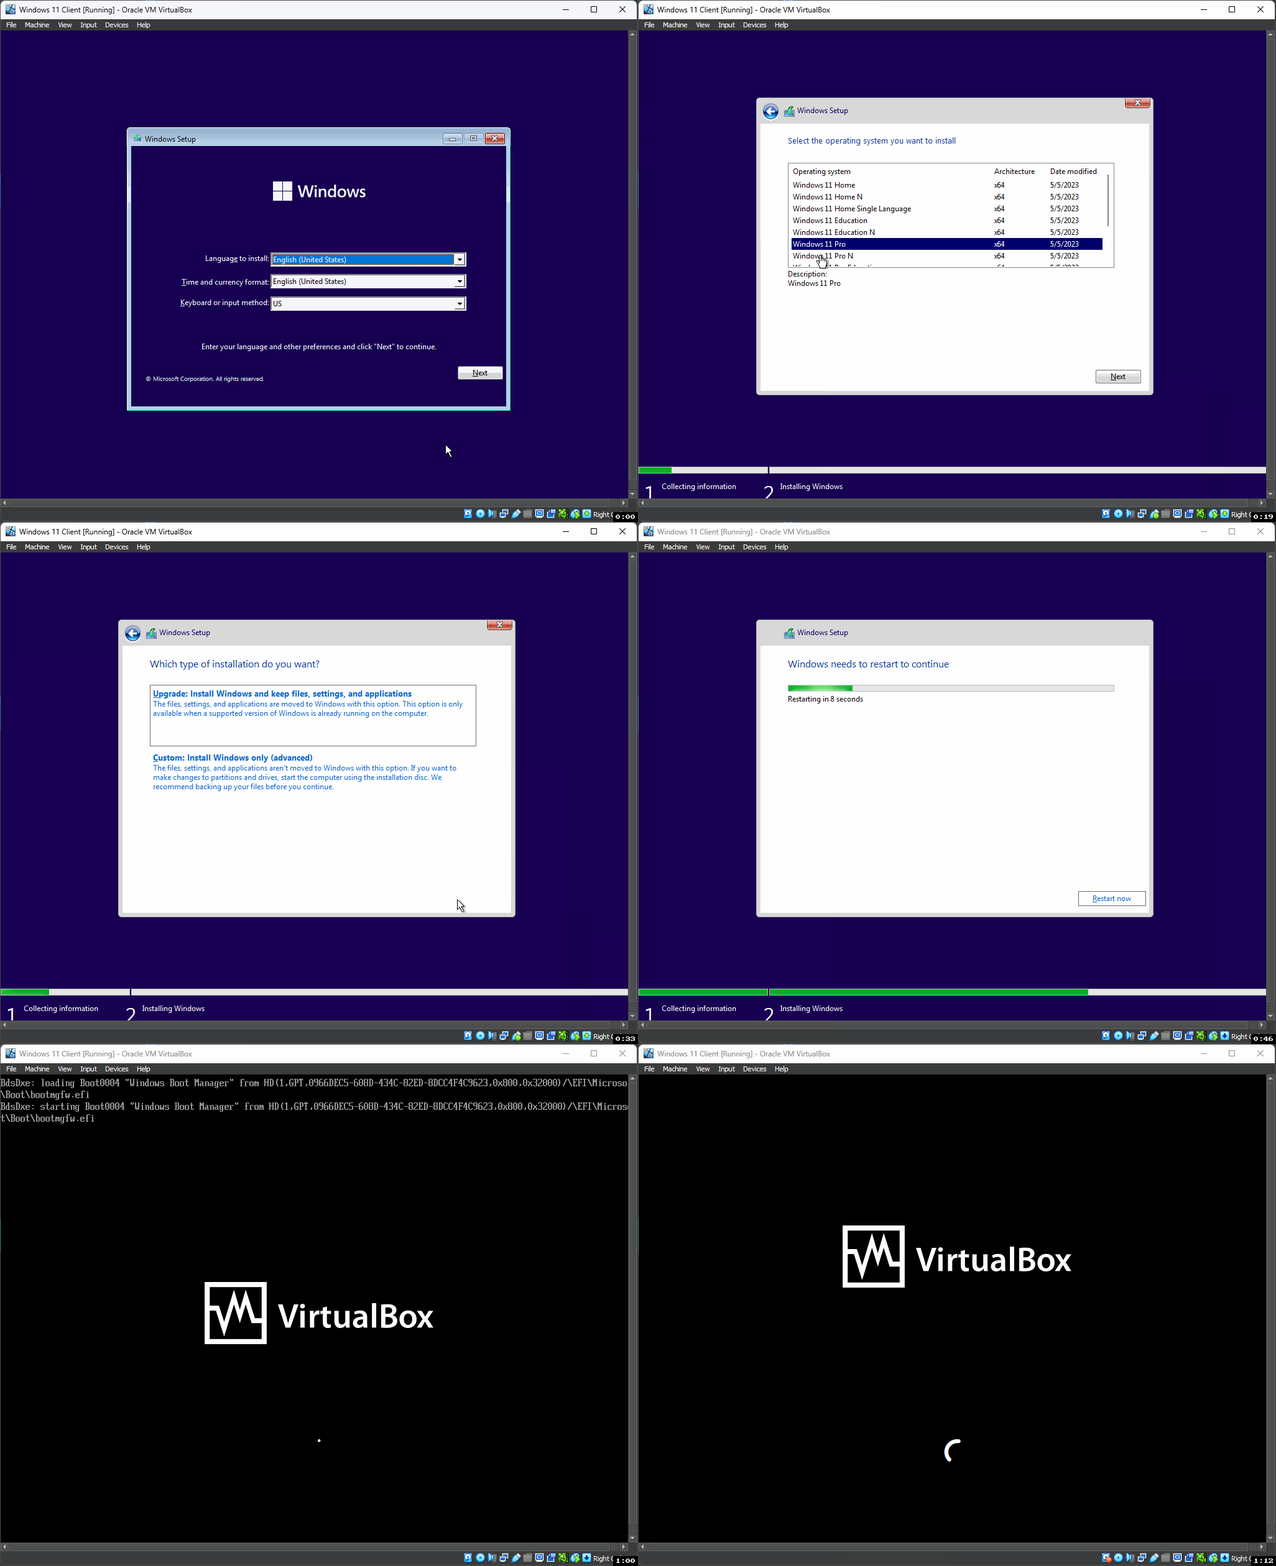
Let the setup run its course. During this process, expect the VM to automatically reboot on several occasions.
Step 3: Navigating the Windows Setup
Once Windows 11 Pro is installed, you'll be guided to the initial setup phase. This is where you'll set preferences like your country or region, keyboard layout, and internet connection. However, during the Windows 11 22H2 setup, you may hit a snag when trying to establish an internet connection.
Not to worry; there's a workaround to bypass the internet setup:
1. Begin the Windows 11 setup process.
2. When you reach the "Let's connect you to a network" screen and find the "Next" button grayed out, press "Shift + F10". This action will open a command prompt window.
3. In the command prompt, enter the command:
oobe\BypassNROOnce you've input the command, the VM will reboot, taking you back to the initial stages of the Windows 11 setup. This time, you'll notice an option saying "I don't have internet". Choose it to continue without an internet link.
4. The subsequent steps in setting up your Windows desktop VM can vary based on the current version or any recent updates. For instance, I had to answer three security queries and set a few additional preferences.
5. Upon wrapping up the setup, you'll find yourself on your desktop's main screen, ready to explore and work.
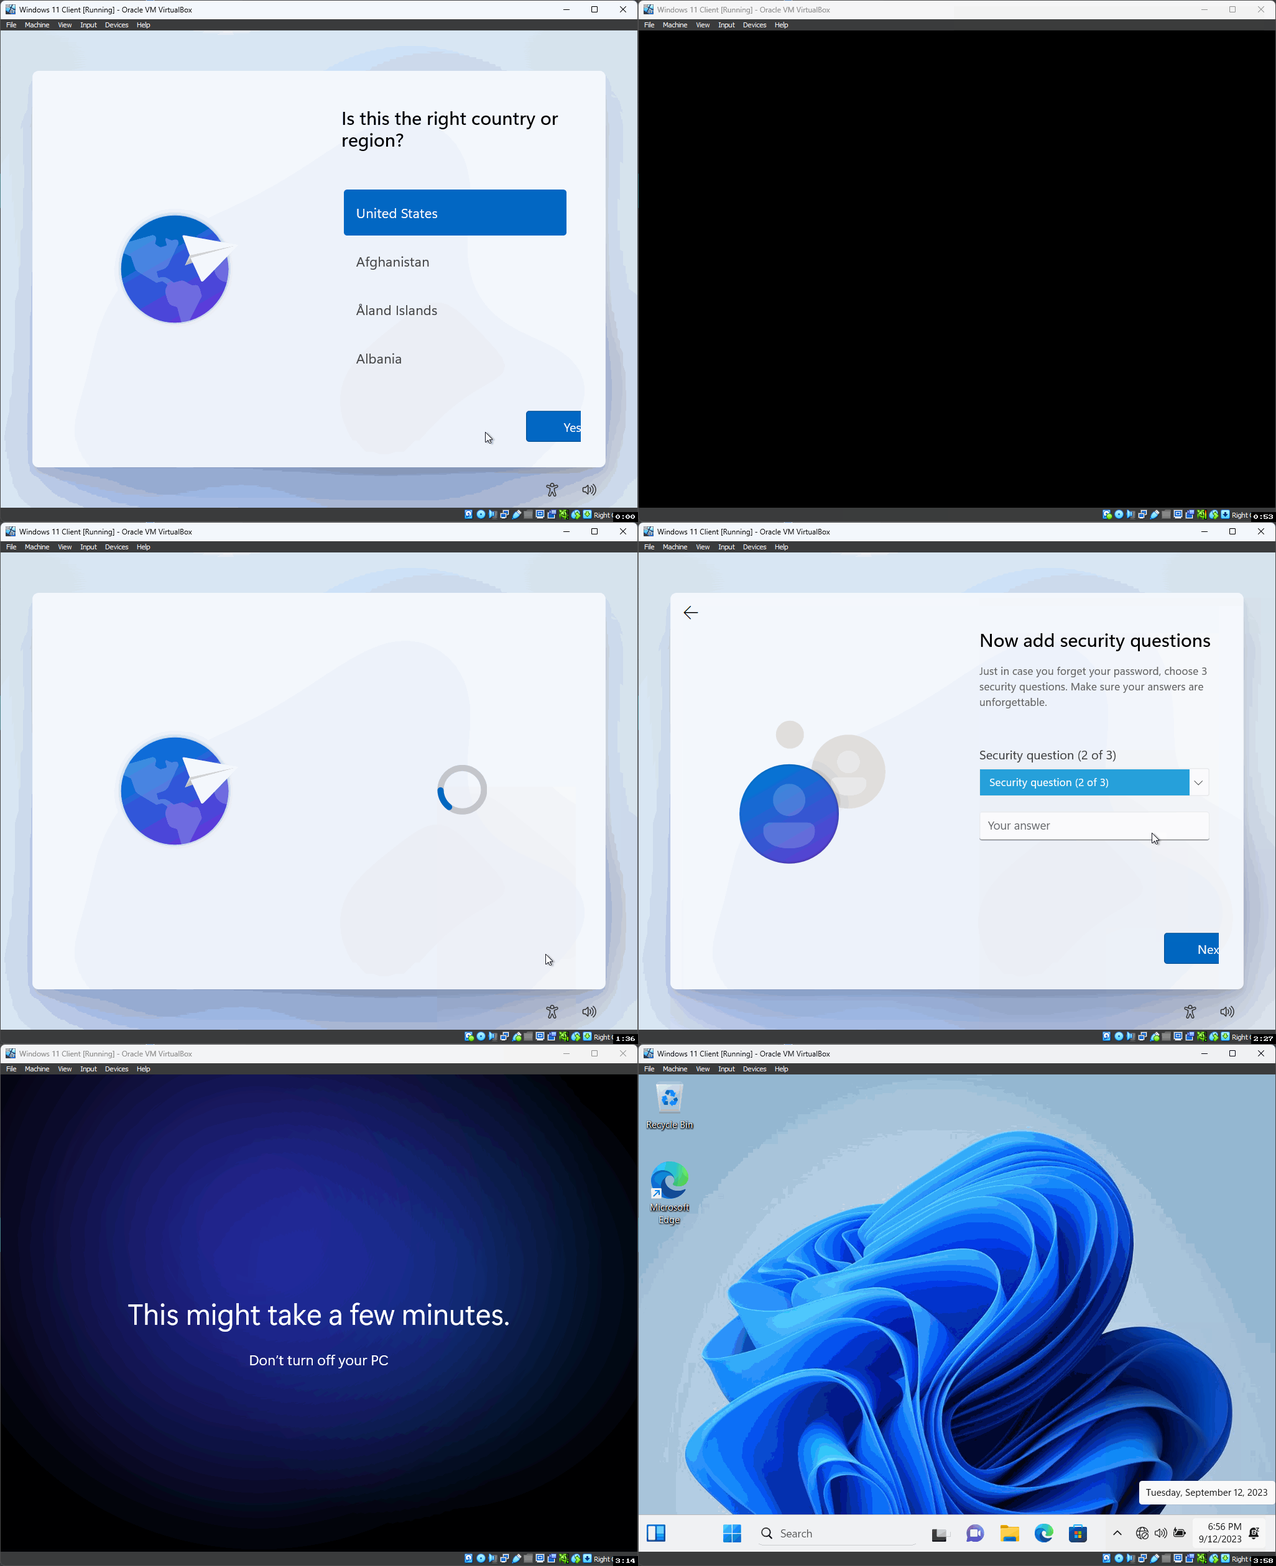
Now we have successfully installed Windows 11 Pro on our virtual machine. Next, we will need to connect the new desktop to our domain.
Connecting Windows 11 Desktop VM to the Domain
To proceed with this section, please ensure that your Windows 11 desktop VM is up and running along with the Windows Server virtual machine operating in the background. The Windows Server VM is responsible for handling everything, including Active Directory, DHCP, Routing, and more. It's crucial to keep the server running as it is required for your users to establish connections in a networked environment. Always have the Windows Server VM running while working with your Windows desktop to avoid any issues.

Step 1: Open Windows Settings
On your Windows Desktop, in the search bar, type Rename your PC. This should take us to the About settings on our desktop.
Step 2: Adjusting Advanced System Settings
Navigate to the settings page of your VM.
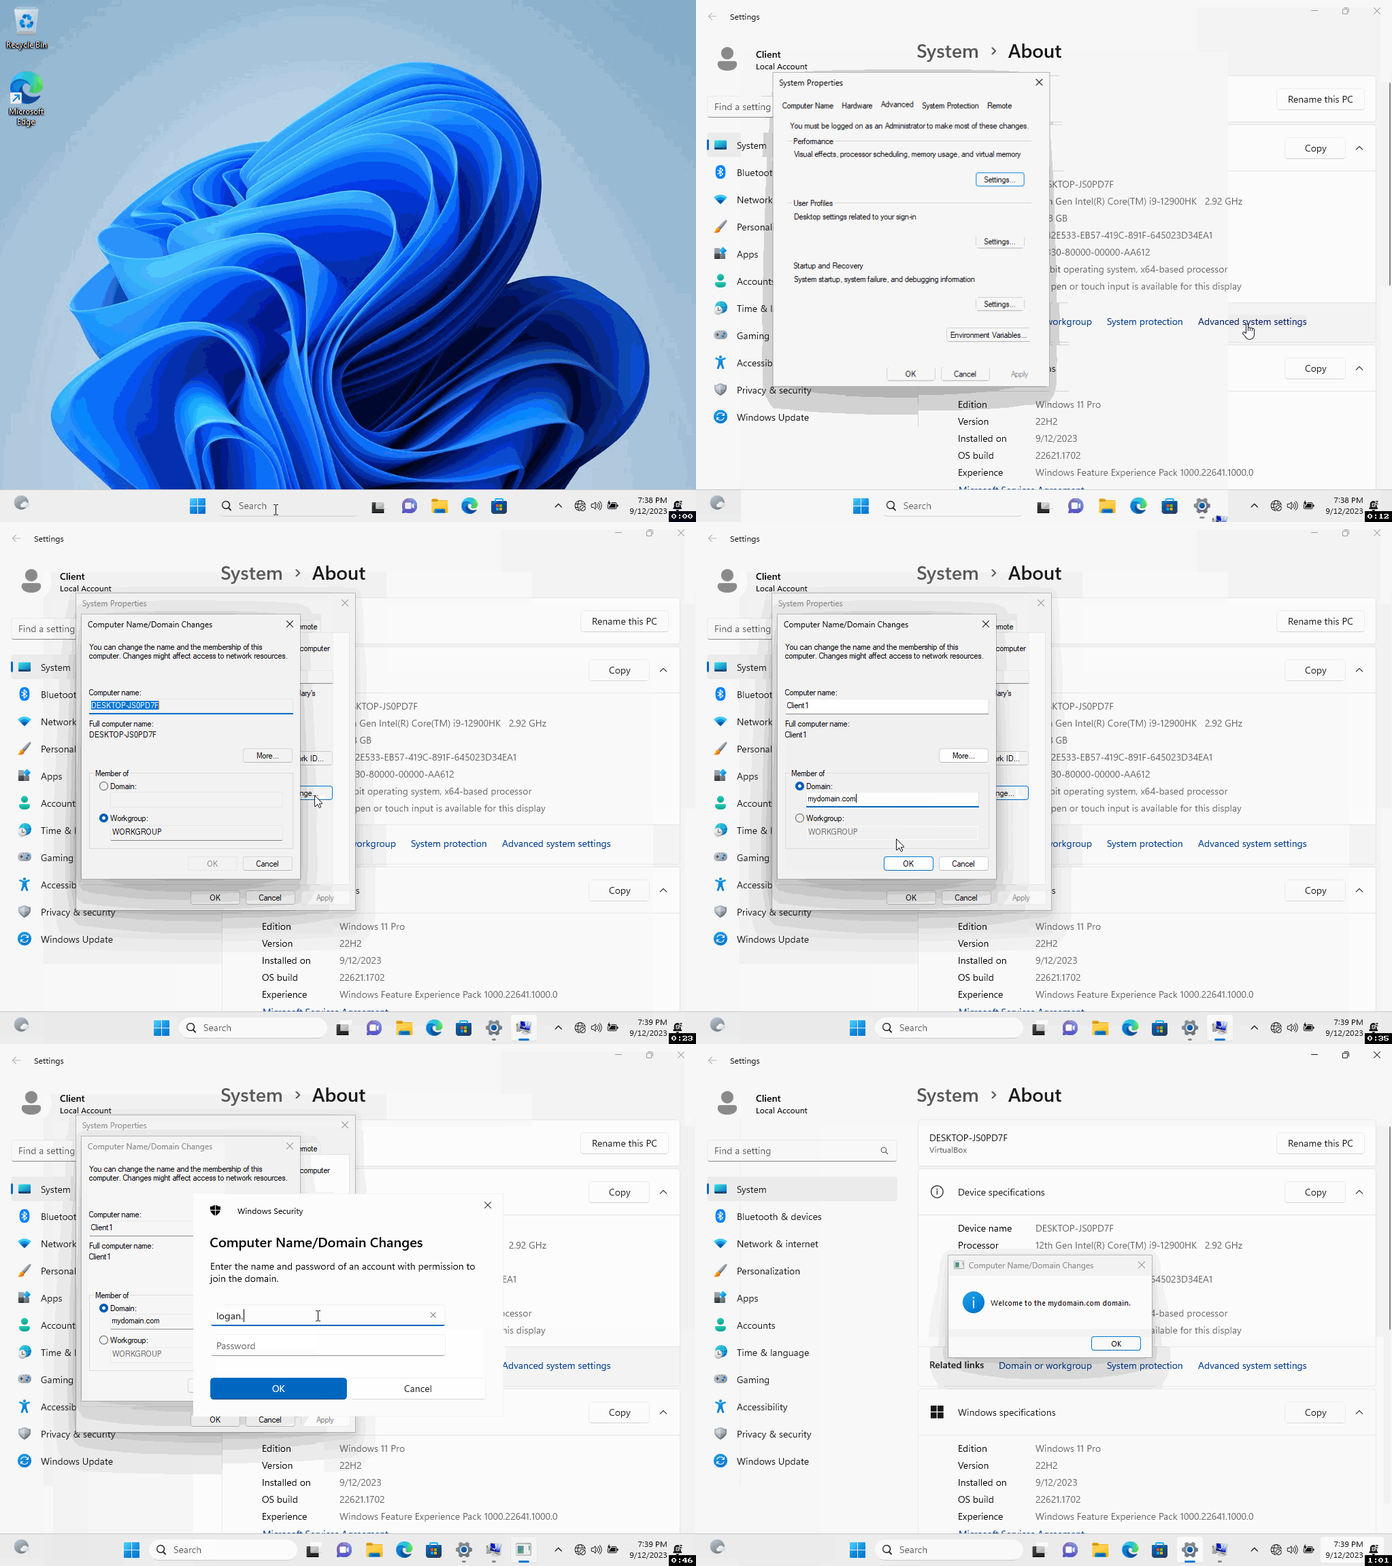
Locate and click on "Advanced system settings" under the device specifications section. This action will bring up the System Properties window.
Within System Properties, select the "Computer Name" tab.
In this tab, find and click the "Change" button on the bottom left. This will prompt the "Computer Name/Domain Changes" window to appear.
By default, a computer name is assigned to your VM. To simplify identification within our Active Directory setup, rename it to "Client1".
In the "Member of" section, choose the "Domain" option and input your company's domain name: "mydomain.com."
Step 3: Signing into a Domain Account
For our desktop to successfully connect to the domain, we will have to sign in as a user. When prompted to sign into the domain under your standard user account.
User name: Enter the User logon name (SAMAccoutAame)
Password: Enter the Password used to set up your account
Step 4: Restart your Virtual Desktop
Upon successfully logging into your account and connecting to the domain, you will be prompted to restart your computer to apply the changes.

Step 5: Accessing the Standard User Account
Once your computer has rebooted after connecting to the domain, you'll be presented with the login screen again. This time, you won't be using the initial 'Client' account credentials set up for the VM. Instead, you'll access the standard user account you established:
On the login screen, select the Other user option located at the bottom-left corner.
User Name: Type in the specific logon name (SAMAccountName).
Password: Input the password associated with this user account.
Upon successful login with your domain credentials, Windows will run a brief setup. Once completed, you'll find yourself at your familiar desktop home screen.
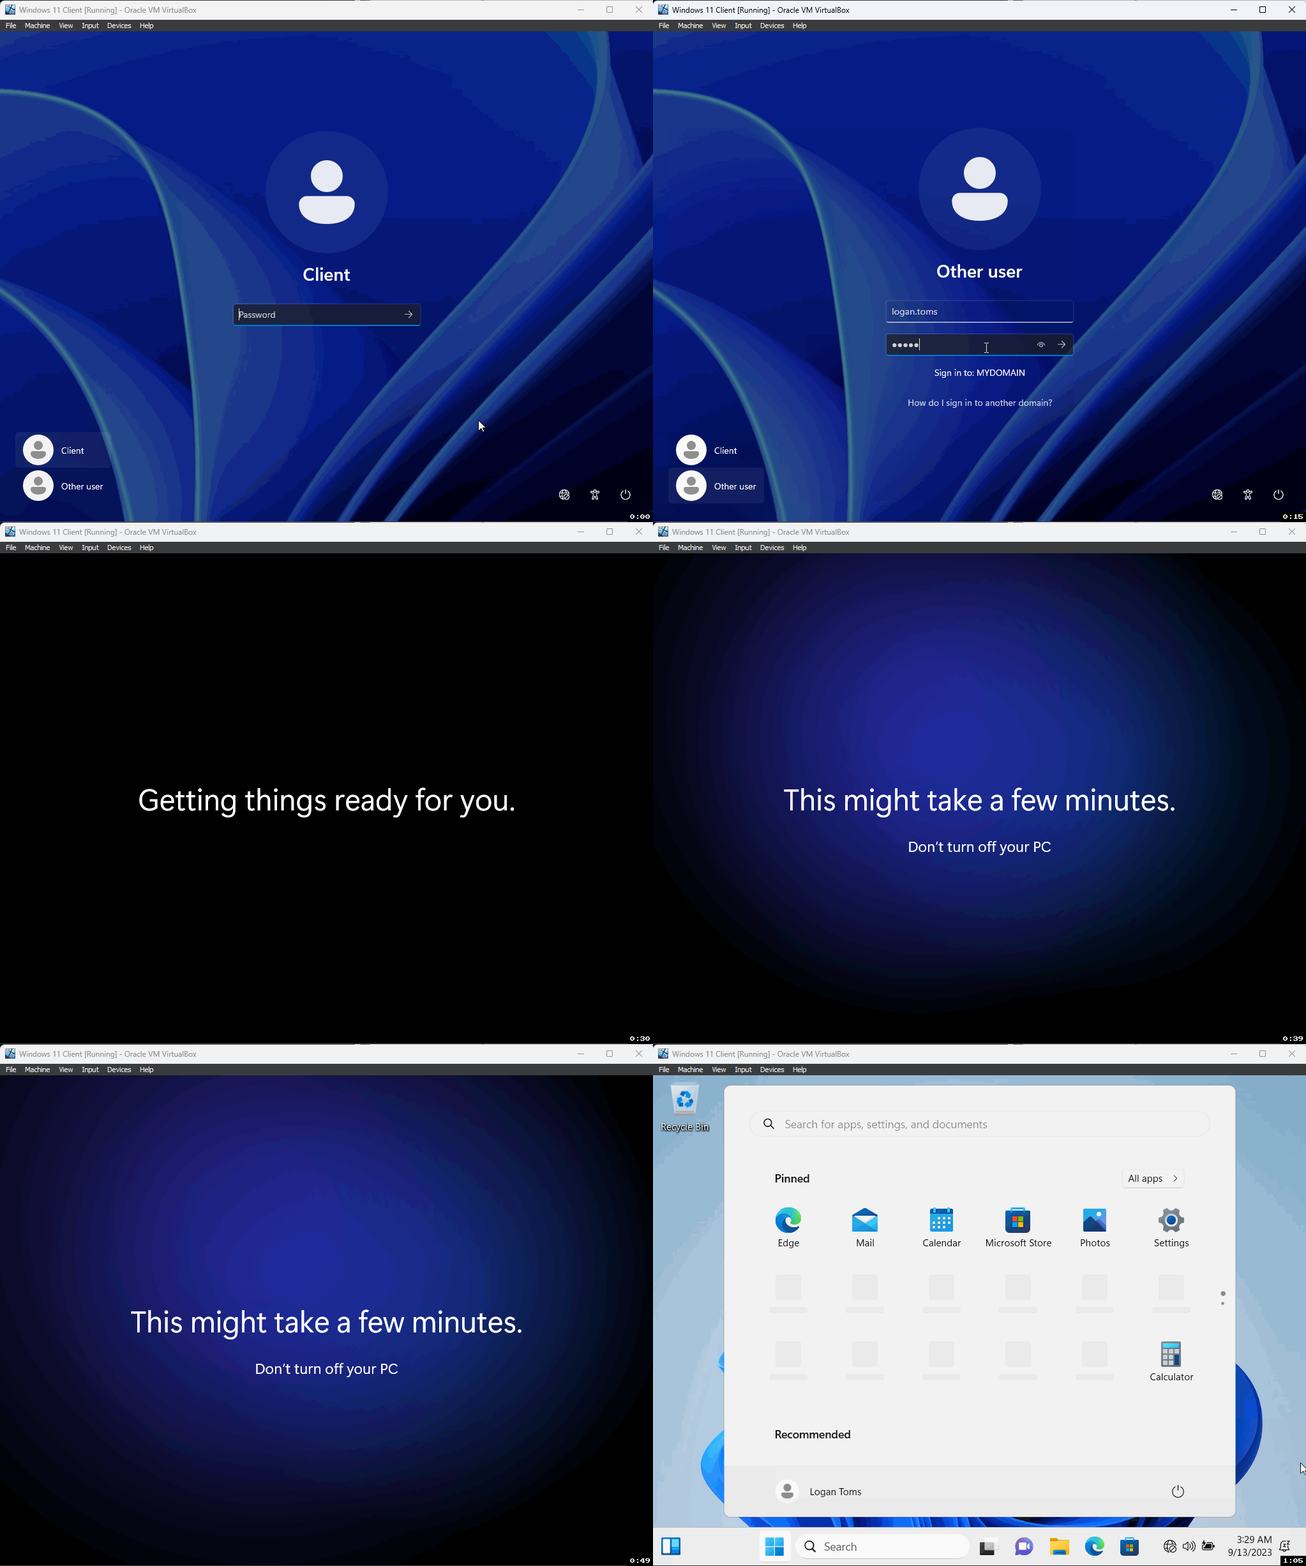
We've successfully integrated your Windows 11 Pro virtual desktop into the domain managed by the Windows Server. By following these steps, your desktop is set up for easy identification and efficient network access. The Windows Server VM plays a pivotal role, ensuring all components of the network communicate effectively.
Finding your Desktop in Active Directory
Now that we have successfully connected our computer to the domain it should be listed within the Active Directory as a computer account. Heres how we can check:
Sign in and access your Windows server
Open the Active Directory application
Within your domain navigate to the Computers folder
Within the computers folder you should see our CLIENT1 desktop
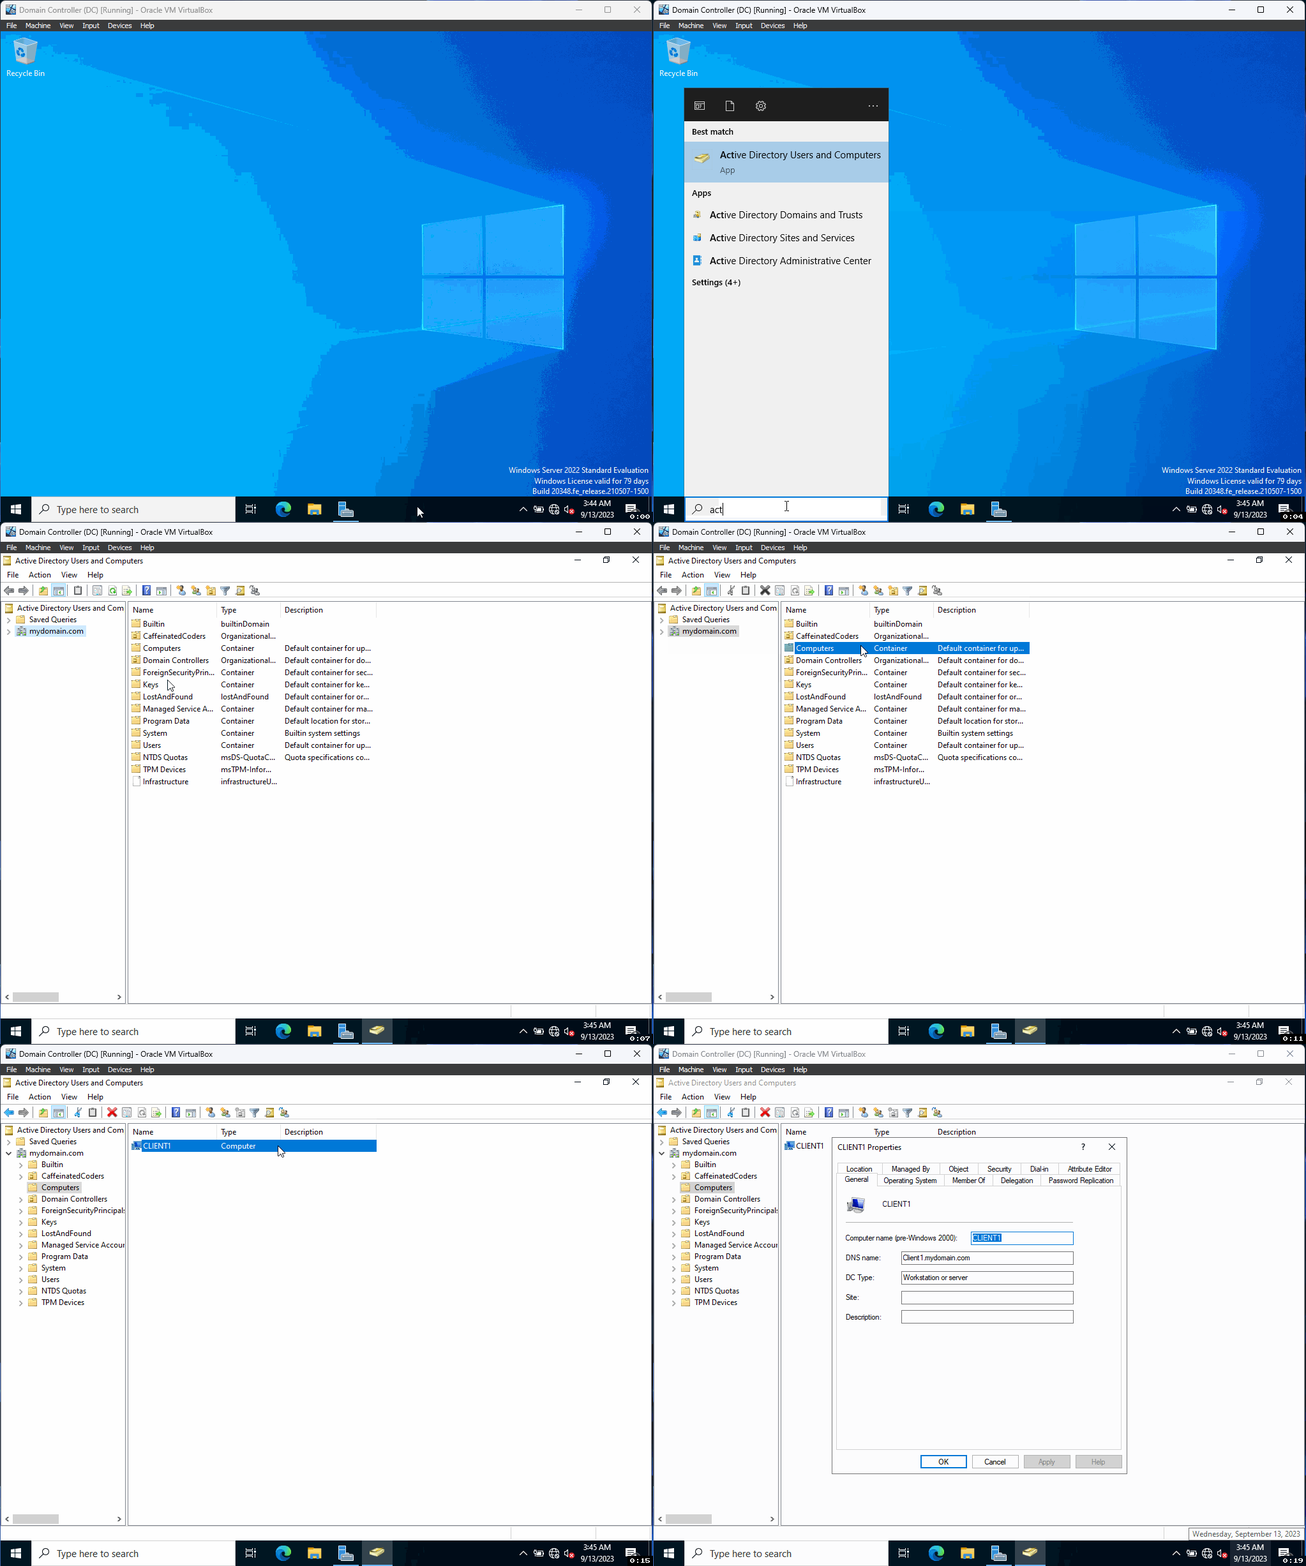
Connecting your virtual desktop to a domain can be a challenging task. This guide has provided you with step-by-step instructions, starting from the initial setup of your desktop to successfully joining it with our company's domain. This groundwork will enable you to create and apply group policies and grant our users access to network resources and shared drives.